

How to Add Multiple Custom Spawn Points in Project Zomboid
Custom spawn points let players start in locations you choose. You set them with Lua files on the server.
Build 42 map coordinates (Rel)
Section titled “Build 42 map coordinates (Rel)”On Build 42, the Project Zomboid map UI does not always show clear Rel values the way older guides expect.
- Prefer Cell (
worldX/worldY) and Rel (posX/posY) when the map still shows them under Map Coordinates - If Rel is missing or unreliable, use a Build 42–compatible custom spawn Workshop mod instead of inventing numbers
- Server and clients must be on the same build (Build 42 stable, or Build 41 via
legacy41)
Build 42 is the default stable release — see How do I update my Project Zomboid server to Build 42?. To remain on Build 41, see How to stay on Project Zomboid Build 41 (legacy41).
Create the Spawn Points File
Section titled “Create the Spawn Points File”- Navigate to the AleForge panel and select your server
- Open Files
- Navigate to
media/maps/ - Create a new file by clicking the button in the top right of the file manager
- Input the code below in the custom spawnpoints code
- Go to the Project Zomboid Map Project and find a location you want your players to spawn at
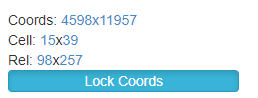
- Click on the
Map Coordinates. Replace the x’s in the code with the Cell and Rel values found at your coordinates. TheworldXandworldYare the Cell values and theposXandposYare the Rel values. You can check out the filled out example here. - You can add more spawn points for one option, like in this example.
- Click
Create Fileand name the filecustom_spawnpoints.lua
Custom Spawnpoints Code
Section titled “Custom Spawnpoints Code”function SpawnPoints() return { unemployed = { { worldX = x, worldY = x, posX = x, posY = x, posZ = 0 }, } }endFilled in Custom Spawnpoints Code
Section titled “Filled in Custom Spawnpoints Code”function SpawnPoints() return { unemployed = { { worldX = 15, worldY = 39, posX = 98, posY = 257, posZ = 0 }, } }endMultiple Spawn Points
Section titled “Multiple Spawn Points”function SpawnPoints() return { unemployed = { { worldX = 15, worldY = 39, posX = 98, posY = 257, posZ = 0 }, { worldX = 15, worldY = 39, posX = 42, posY = 54, posZ = 0 }, { worldX = 15, worldY = 39, posX = 137, posY = 179, posZ = 0 } } }endCreating Multiple Spawn Point Options
Section titled “Creating Multiple Spawn Point Options”To create multiple spawn point options, please follow steps 1 through 9 above but choose a different name, such as myspawn_spawnpoints.lua .
Restricting Spawn Points to an Occupation
Section titled “Restricting Spawn Points to an Occupation”If you wish to add occupation-specific spawn points, you can create spawnpoints.lua similar to the below:
function SpawnPoints()return { constructionworker = { { worldX = 129, worldY = 37, posX = 42, posY = 32, posZ = 0 }, { worldX = 129, worldY = 37, posX = 172, posY = 101, posZ = 0 }, { worldX = 129, worldY = 37, posX = 38, posY = 131, posZ = 0 } }, fireofficer = { { worldX = 10, worldY = 222, posX = 191, posY = 4, posZ = 0 }, { worldX = 10, worldY = 222, posX = 207, posY = 174, posZ = 0 }, { worldX = 10, worldY = 222, posX = 34, posY = 62, posZ = 0 }, { worldX = 10, worldY = 222, posX = 142, posY = 135, posZ = 0 } }, parkranger = { { worldX = 8, worldY = 171, posX = 15, posY = 109, posZ = 0 }, { worldX = 8, worldY = 171, posX = 219, posY = 88, posZ = 0 }, { worldX = 8, worldY = 171, posX = 117, posY = 125, posZ = 0 }, { worldX = 8, worldY = 171, posX = 142, posY = 63, posZ = 0 } }, policeofficer = { { worldX = 17, worldY = 114, posX = 39, posY = 208, posZ = 0 }, { worldX = 17, worldY = 114, posX = 137, posY = 10, posZ = 0 }, { worldX = 17, worldY = 114, posX = 86, posY = 227, posZ = 0 } }, securityguard = { { worldX = 121, worldY = 169, posX = 177, posY = 79, posZ = 0 }, { worldX = 121, worldY = 169, posX = 158, posY = 219, posZ = 0 }, { worldX = 35, worldY = 94, posX = 67, posY = 47, posZ = 0 } }, unemployed = { { worldX = 172, worldY = 49, posX = 155, posY = 18, posZ = 0 }, { worldX = 172, worldY = 49, posX = 81, posY = 188, posZ = 0 }, { worldX = 172, worldY = 49, posX = 89, posY = 218, posZ = 0 } }}endAdding SpawnRegions
Section titled “Adding SpawnRegions”- After you have created your spawn point files open
Filesagain - Navigate to
.cache/Server - Click
dedicated_spawnregions.luato open it for editing - Add any spawn files you created. You can name the spawns anything you like. Each spawnpoint requires its own file. It should look similar to the below example
dedicated_spawnregions.lua file name may be different depending on the name of your save file
function SpawnRegions() return { { name = "Muldraugh, KY", file = "media/maps/Muldraugh, KY/spawnpoints.lua" }, { name = "Riverside, KY", file = "media/maps/Riverside, KY/spawnpoints.lua" }, { name = "Rosewood, KY", file = "media/maps/Rosewood, KY/spawnpoints.lua" }, { name = "West Point, KY", file = "media/maps/West Point, KY/spawnpoints.lua" }, { name = "My AleForge Spawn", file = "media/maps/custom_spawnpoints.lua" }, }end