

How do I install mods on my Palworld server?
Installing mods on a Palworld server is designed to be as easy as possible. Here’s how you can do it with your AleForge server, based on the official Palworld server modding guide.
Before You Start
Section titled “Before You Start”- Only mods that are built to run on servers will work. If the mod’s
Info.jsondoes not include"IsServer": truein itsInstallRulesection, it is not designed for servers - Many Workshop and pak-based mods work on the standard Linux Palworld server. Always check the mod page for platform requirements
- UE4SS is optional. Only install it if a mod specifically requires the UE4SS framework — see Installing UE4SS (Optional) below
Installing Steam Workshop Mods
Section titled “Installing Steam Workshop Mods”Using the Blacksmith’s Portal
Section titled “Using the Blacksmith’s Portal”- Go to the Steam Workshop for Palworld
- Subscribe to each of the Workshop mods you’d like to install
- Go to the Steam directory where Workshop mods are downloaded by default, e.g.
Steam\steamapps\workshop\content\1623730 - You will see a bunch of folders with numbers for names. These are your mods, and each one contains an
Info.jsonfile - Select all of these folders, right click and select
Send To -> Compress To Zip - Name the file that is created
mods.zip - Go to the Blacksmith’s Portal and open the
Filestab on your server - Create a directory called
Modswith theCreate Directorybutton, open it, and create another directory calledWorkshop - Upload your created
mods.zipfile here, then right click it and selectUncompress
Each mod folder must contain an Info.json directly inside it, e.g. Mods/Workshop/[any folder name]/Info.json. The folder name itself doesn’t matter.
Self-Hosting/Other Providers
Section titled “Self-Hosting/Other Providers”- Ensure your server is offline
- Subscribe to your mods on the Steam Workshop for Palworld
- Copy the downloaded mod folders from
Steam\steamapps\workshop\content\1623730into theMods/Workshopdirectory next to your Palworld server executable
Alternatively, you can point the server directly at your Steam Workshop directory instead of copying files, using either of the following:
- Add
WorkshopRootDir=<absolute path>under the[PalModSettings]section inMods/PalModSettings.ini - Add the launch option
-workshopdir="<absolute path>"
Enabling Your Mods
Section titled “Enabling Your Mods”Unlike the game client, the dedicated server requires mods to be enabled in Mods/PalModSettings.ini before they will load.
- Start your server once so the
Mods/PalModSettings.inifile is generated automatically, then stop it - Open
Mods/PalModSettings.iniin the file editor - Set
bGlobalEnableMod=true - Add an
ActiveModList=line for each mod you want to load, using thePackageNamevalue found in the mod’sInfo.json(not the folder name)
[PalModSettings]bGlobalEnableMod=trueActiveModList=GamingCattivaActiveModList=FarmingQuivern- Restart your server to deploy the mods
When the server restarts, Mods/ManagedMods/<PackageName>/InstallManifest.json is created automatically and the mod files are deployed to the correct locations based on the InstallRules in each mod’s Info.json. If you ever need to start the server without mods, add the -NoMods launch argument to forcibly disable all of them.
Installing UE4SS (Optional)
Section titled “Installing UE4SS (Optional)”Some mods depend on UE4SS, a mod loader the Palworld community uses to load mods into the game. You only need this if your chosen mods require it — Workshop mods that do not depend on UE4SS can run without this step.
Using the Blacksmith’s Portal
Section titled “Using the Blacksmith’s Portal”On AleForge, switch to the Palworld UE4SS install when you need the UE4SS framework:
- Go to the AleForge Panel
- Select your server and ensure it is offline
- Go to
Settings, use Change Game to selectPalworld UE4SS, then click Reinstall Server - If you used Game Swap instead, upload your world and set
DedicatedServerNameusing the upload guide before expecting your old save to load
Your server now includes UE4SS.
Self-Hosting/Other Providers
Section titled “Self-Hosting/Other Providers”- Download the latest version of UE4SS
- Find your dedicated server folder
- Move your downloaded
.zipof UE4SS toPalServer\Pal\Binaries\Win64(or the equivalent binaries folder for your server build) - Extract UE4SS
- UE4SS will now be installed to your dedicated server
Installing Mods Manually (Outside the Workshop)
Section titled “Installing Mods Manually (Outside the Workshop)”Mods from sources like Nexus Mods can still be installed by hand. For example, using CreativeMenu by Okaetsu:
- Manually download the
.zipfile for Steam and Dedicated servers - Upload this file to
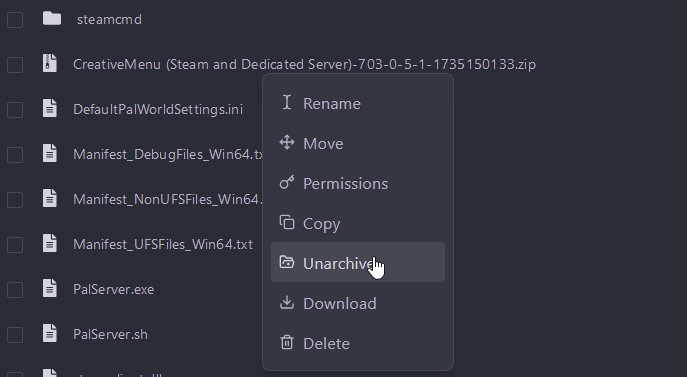
/home/containerin the Files tab on your server (or the root directory of your dedicated server if self-hosting) - Right-click the uploaded file and select
Unarchive
- Now, you can start your server with your mod installed!
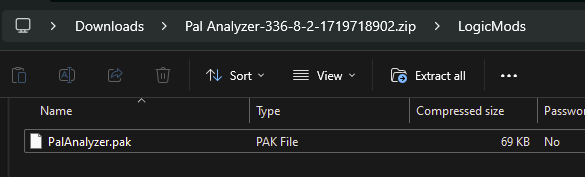
If your mod comes downloaded as a folder and a .pak file, you can simply upload the .pak file to Pal/Content/Paks/LogicMods
Updating or Removing Mods
Section titled “Updating or Removing Mods”- Updating: if the
Versionin a mod’sInfo.jsonchanges, restarting the server will automatically uninstall the old version and deploy the new one - Removing: remove the mod’s
PackageNamefrom theActiveModListlines inMods/PalModSettings.ini. If needed, also delete its folder underMods/Workshop/, then restart the server
Troubleshooting
Section titled “Troubleshooting”If a mod doesn’t work or won’t enable, check the following:
- Is the mod compatible with dedicated servers? If the
InstallRulesection in itsInfo.jsondoes not include"IsServer": true, the mod is not designed to run on servers - Does the mod require UE4SS? If so, make sure you are on
Palworld UE4SS(or have UE4SS installed) and that any other prerequisite mods are present - Was the mod deployed correctly? Check that
Mods/ManagedMods/<PackageName>/was created after restarting, and verify the deployed files